Cameras and Primary Rays
A camera in a ray tracer maps an image-space sample to a ray origin and direction. Although practical camera classes often expose many convenience settings, this mapping is their essential contract, and every parameter should be understood in terms of its effect on the resulting family of rays.
A physical pinhole camera forms an inverted image on a sensor behind its aperture; rendering systems usually use an equivalent virtual image plane in front of the eye and cast rays outward into the scene, preserving the same projective geometry while making the associated coordinate bookkeeping more convenient.
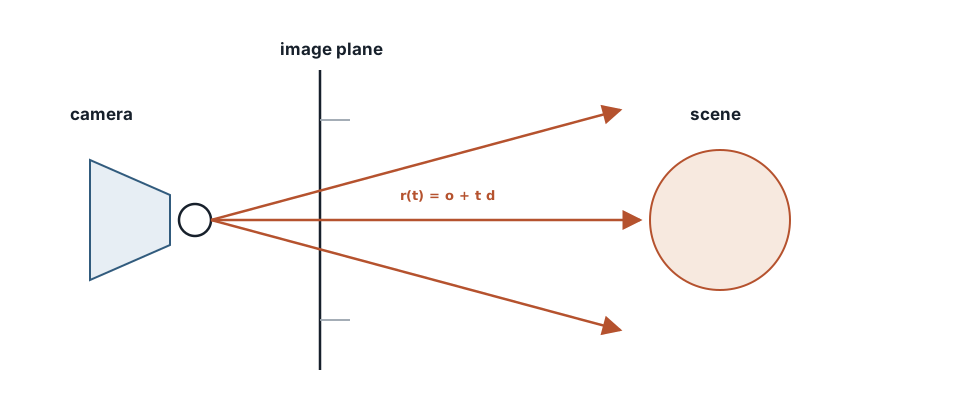
Each sample on the image plane defines one primary ray into the scene.
Camera parameters
Store at least:
- eye position
origin - look direction
- up hint
- vertical field of view
- aspect ratio
Build an orthonormal basis u, v, w as in the vectors chapter. Whether the camera looks along -w or +w is a convention. Consistency with the rest of the renderer is not optional.
For vertical FOV in radians:
$$ \begin{aligned} h &= 2\tan(\mathrm{vfov}/2) \ w &= h \cdot \mathrm{aspect} \end{aligned} $$
If the image plane sits one unit in front of the eye along -w:
lower_left = origin
           - (viewport_width/2) * u
           - (viewport_height/2) * v
           - w
horizontal = viewport_width * u
vertical   = viewport_height * v
The camera basis must be recomputed whenever the eye position or orientation changes, because a stale basis after a cut, teleport, or animation update produces rays that are numerically valid but geometrically unrelated to the intended view.
From pixel coordinates to a ray
For pixel (i, j) in an image of size nx × ny, with sample offsets (s, t) inside the pixel:
us = (i + s) / nx
vs = (j + t) / ny
p  = lower_left + us * horizontal + vs * vertical
ray.origin = origin
ray.direction = normalize(p - origin)
Center sampling uses s = t = 0.5. Antialiasing uses stratified or random offsets in [0, 1). Decide whether j = 0 is the top or bottom row and convert explicitly at every boundary with textures, window buffers, and image loaders. An inverted Y in one place only flips the world and wastes hours.
Thin lens and time
A thin-lens camera samples an origin on a lens disk and aims at the same focus-plane point p. Depth of field is that extension. The pinhole model should be correct before thin-lens sampling is added.
If geometry or the camera moves during a shutter interval, sample a time, evaluate poses at that time, then generate the ray. Motion blur is another integral. Primary rays remain the same idea.
Required debug views
Before shading, implement:
- ray direction as color
- hit distance
tas grayscale - normals as color
Orbit the camera. If those three views remain coherent, the camera is probably correct. If the image mirrors under yaw, the basis or handedness is wrong.
Common errors
- Passing degrees to a function that expects radians
- Ignoring aspect ratio and stretching spheres into ellipsoids
- Building
uandvfrom a non-unit look vector - Inverting Y in only one subsystem
- Reusing one ray for every sample in a pixel and calling the result antialiased
When GenerateRay(i, j, s, t) is dull and reliable, later failures are more likely to be genuine shading or sampling issues.
Field of view and focal length
Vertical FOV and focal length are related once a film height is chosen. In a unit-plane formulation you often never store focal length explicitly. In a lens model you will. Do not mix a focal-length camera with a pure FOV viewport without converting carefully. Stretch artifacts usually mean the aspect ratio or FOV conversion is wrong, not that spheres are broken.
Viewport mapping checklist
- Choose pixel origin (top-left or bottom-left).
- Map pixel centers or continuous sample positions to normalized plane coordinates.
- Apply aspect ratio only once.
- Transform plane coordinates through
uandv. - Normalize the direction.
Write those five lines as comments above the function. When a screenshot looks stretched, walk the list in order.